
How To Fill A Large Planter & Manage Drainage
How To Fill A Large Planter & Manage Drainage
A large planter brings height and structure to a garden, patio or terrace, and even a small plot benefits from one good feature to build around. Filling it well takes more thought than just emptying a bag of compost into it.
Drainage, weight and the order you fill things in all matter. Get them wrong, and you end up with waterlogged roots, a container too heavy to move, or far more compost than you needed. Get them right, and the planter keeps plants healthy for years. What follows covers the whole job and works for any large planter, whatever it is made from. Where the material changes the approach, we will say so.
1. Choosing the right spot
Decide where the planter will live before you fill it. Most plants want decent light and some shelter from the wind, so match the spot to whatever you mean to grow. Pick somewhere you can reach easily too, because a big container needs watering often once summer arrives.
People tend to forget about the weight. Fill a large planter with damp compost, and it becomes heavy, usually heavier than it looks, so position it empty and fill it where it is going to stay. Tall planters especially can get top-heavy and tip in a strong gust. On a roof terrace or balcony, check what load the surface will take before you start.
Bottomless planters are a slight exception. They are open at the base so plants root into the ground below, which means they need to sit on soil rather than a hard surface.
2. Raising it on pot feet
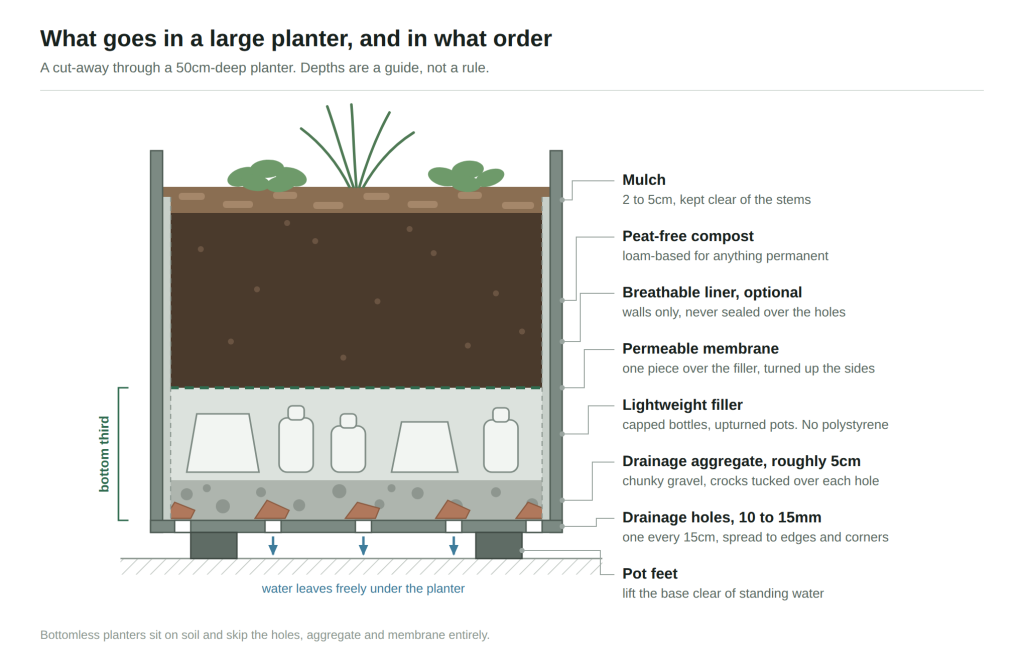
Stand the planter on pot feet, or any small spacers, and the drainage holes stay clear of standing water so it can actually drain. Air gets to move underneath as well, and you avoid the damp marks planters tend to leave on decking or paving. On any hard surface, it is worth the small effort.
3. Sorting out drainage
Drainage matters more than anything else here. When water cannot escape, it pools around the roots, which then sit starved of air and begin to rot.
How many holes you need comes down to size, but one in the middle is never enough on a large planter. Water gathers towards the edges and corners, so spread several holes across the whole base, each at least 10 to 15mm across. A hole every 15cm or so is a fair guide, and a big, heavily planted container can take more.
If you are drilling your own, match the bit to the material. Steel and other metals want a sharp HSS or titanium bit run slowly with a dab of oil, so it does not overheat or skid; start with a small pilot hole and open it out from there. Wood and most plastics are straightforward with an ordinary bit. Whatever the planter, smooth off the sharp burrs around each hole afterwards.
Then keep those holes clear once everything is filled and in place, which is exactly what the pot feet are for. With a bottomless planter, you can mostly skip this section, since water drains straight into the ground.
4. Adding a drainage layer
A drainage layer at the base of the planter helps water move away from the roots and stops compost from blocking the holes. Two things do most of the work here.
First, tuck a few pieces of broken terracotta, stones or larger pebbles around each drainage hole. That keeps the compost off the holes themselves, so water can carry on flowing out even once the planter has settled.
Then add a couple of inches of drainage aggregate across the base, roughly 5cm. Horticultural gravel, coarse pebbles or clean broken crocks all work; whatever you use, keep the pieces on the chunky side so water has clear routes to trickle through. In a tall or exposed planter, this layer also adds a bit of useful weight low down, which helps with stability.
Bottomless planters are the exception, since water drains straight into the ground below and no separate layer is needed.
A separation membrane goes on top of the drainage layer to keep the compost above from washing down into it, which is covered in section 7 below, alongside the same fabric’s role above any filler.
5. Lining the planter
A liner is optional, but it often pays off. It protects the inside of the planter and keeps the compost slightly damper and steadier in temperature.
How much it helps comes down to the material. Metal heats and cools quickly, so a breathable liner blunts both summer sun and winter frost; terracotta is porous and holds moisture better with one fitted; timber lasts longer when a barrier keeps the wet compost off it. For the liner itself, hessian, a breathable membrane or even bubble wrap will do.
Fit it against the sides and either leave the base open or cut openings over the drainage holes. This is the part people get wrong. A sealed plastic liner laid over the holes turns the planter into a bucket, and the compost stays sodden. Always give the water a clear way out. It also helps to keep two ideas apart: a breathable liner sits against the walls for insulation and protection, and still drains freely, whereas a waterproof inner sleeve, used to stop a porous pot from marking a wall or floor, must have holes punched through to line up with the planter’s own.
6. Using fillers to save soil and weight
You rarely need compost all the way to the bottom. Roots only reach so far down, so packing the lower section with something lightweight saves on compost and keeps the whole thing easier to lift. Good options include:
- Clean plastic bottles with the caps on, which take up space for almost no weight.
- Smaller plastic pots turned upside down, useful for the same reason and they leave handy air pockets.
- Natural bits such as sticks, old compost or broken-up cardboard, which rot down over time and suit a seasonal display.
A few things are best avoided. Polystyrene and Styrofoam were once popular for this, but they crumble into microplastics over time, so leave them out. Skip anything that packs down into a dense, water-blocking mass, and anything that might leach chemicals into the soil, which matters most if you are growing food.
As a rough rule, keep filler to the bottom third or half so the roots still have plenty of depth.
7. Adding a fabric layer
A permeable landscaping fabric or geotextile membrane sits above the drainage layer, and above any filler you have added, to stop compost washing down into either. It also filters the drainage water on its way through, keeping fine dirt inside the planter, and it makes lifting everything out to replant far easier later on.
If you are using filler, the simplest approach is a single piece of fabric laid straight across the top of the filler, since the filler sits on top of the drainage aggregate and one membrane covers both. Without filler, lay it directly over the drainage layer instead.
Use something that lets water through. Woven landscape or geotextile fabric is ideal. Thin weed membrane will do at a push but tends to clog, and solid plastic such as an old compost bag is the one to avoid, since water just sits on top of it. Cut the piece a little larger than the planter and run it an inch or two up the sides, so compost cannot slip down the gaps at the edges. There is no need to fix it down; the weight of the compost holds it in place.
8. Choosing the right compost
This is the layer the plants actually grow in, so do not cut corners on it. Reach for a good peat-free compost rather than garden soil, which packs down and drains badly once it is shut inside a container.
For a seasonal display, a bag of peat-free multipurpose is fine on its own. For anything permanent, a shrub, a small tree, or a planter you would rather not empty every year, use a loam-based compost, sold as John Innes No. 2 or No. 3. Loam-based simply means it contains real soil, which gives it weight, holds on to nutrients far longer, and does not collapse and sink the way a light multipurpose mix eventually will. Plenty of people blend the two: loam-based for structure, with some multipurpose mixed through.
Depending on what you are planting, a few additions help:
- Perlite or vermiculite to open up the mix and stop it compacting in deeper planters.
- Water-retaining granules in large containers, which even out the moisture between waterings.
- A compost matched to the plants, say an ericaceous mix for acid-lovers such as camellias, rhododendrons and blueberries.
Even good compost tires after a year or two as nutrients wash out and the structure breaks down. For a permanent planter, scrape off the top few centimetres each spring and replace it with fresh compost, and plan to change the lot every two or three years. A seasonal display just gets refreshed whenever you replant.
9. How much compost you will need
It is easy to under-buy and run short halfway through. To get a rough figure, multiply the planter’s length, width and depth in metres. That gives the volume in cubic metres, and since a cubic metre is 1,000 litres, it converts straight to the litre bags compost is sold in.
Worked through: a planter 80cm long, 50cm wide and 50cm deep is 0.8 by 0.5 by 0.5, which comes to 0.2 cubic metres, or 200 litres filled to the brim. You will not fill it to the brim, though. Take off the bottom third for filler and a couple of centimetres at the top for mulch, and you are buying nearer 130 litres. Only the space above the filler needs paying for.
As a rough ready reckoner, once you have allowed for filler in the base:
Planter size (approx.) | Compost needed (guide) |
Small, around 40cm cube | 60 to 70 litres |
Medium, around 60cm cube | 200 litres |
Large, around 80cm cube | 350 to 400 litres |
Extra large, 1m cube and up | 700 litres and up |
Treat these as a starting point and adjust for the shape and for however much filler you have used. With a bespoke planter, the maker can usually give you a volume to work from.
10. Planting up
Now for the planting. Designers often work to a simple idea called “thriller, filler, spiller”. The thriller is one tall plant for height, set towards the back or centre: an ornamental grass such as Calamagrostis, a phormium, a cordyline or a small multi-stem tree all suit the role. The filler is the rounded, mid-height planting that bulks out the middle, things like heuchera, hardy geraniums, salvia or a softer grass such as Stipa. The spiller breaks the hard edge by trailing over the rim, where ivy, trailing verbena, bidens or creeping jenny work well. One of each and a large planter looks the part straight away.
Match the plants to the spot, too. A sunny position suits lavender, salvia, pelargoniums and most grasses; a shadier one is better for ferns, hostas, heuchera and hellebores. Check that everything sharing a planter wants the same amount of water as well, so you are not drowning one plant to keep its neighbour going.
Think about the whole year while you are at it. A few evergreens alongside seasonal colour, or bulbs tucked under later-flowering plants, will keep things going long after summer. And leave room to grow, since planting that looks a little sparse at first soon fills in.
11. Adding mulch
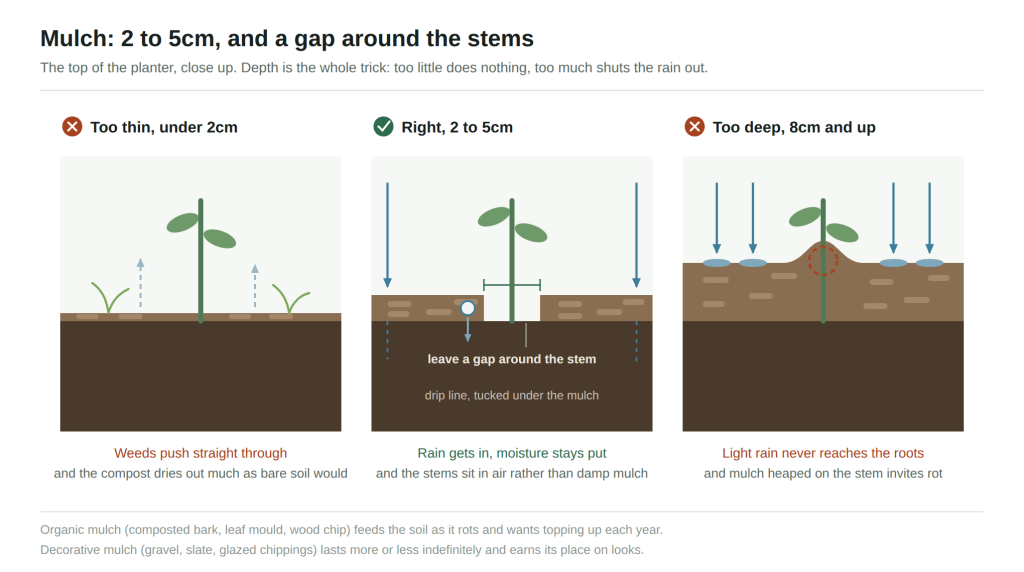
A layer of mulch on top does more than its size suggests. It holds moisture in the compost and keeps weeds down, and it tidies the surface at the same time. Two to five centimetres is about right: less than that achieves little, while a deep layer can stop light rain reaching the roots. Leave a small gap around stems and trunks, since mulch heaped against them traps damp and invites rot.
There are two broad choices. Organic mulches such as composted bark, leaf mould or wood chip feed the soil as they rot down, though they need topping up each year. Decorative mulches such as gravel, slate or glazed chippings last more or less indefinitely and earn their place on looks, which is where you can choose a tone to suit the planter, whether that is weathered Corten or a powder-coated colour (this depends on the chosen planter material). For a permanent display, a thin decorative layer over the compost works well, with a small tidy-up once a year.
12. Watering, feeding and care
Containers behave differently from open ground. They dry out unevenly, the middle staying damp while the edges bake, so steady watering counts for a lot. On bigger displays, drip irrigation or a self-watering reservoir takes the guesswork out.
Compost runs low on nutrients in time, so feed through the growing season and refresh some of it each year. Beyond that, the planter itself should ask very little of you, which is the argument for buying a well-made one to begin with. LuxUnique’s steel planters, for instance, are built to last through the seasons and carry a five-year structural warranty, so you can think about the plants rather than the pot.
13. Mistakes to avoid
- Filling the whole planter with compost when fillers would save you compost and a lot of weight.
- Blocking the drainage holes, or skipping pot feet on a hard surface.
- Relying on garden soil alone, which compacts and drains badly in containers.
- Adding a deep gravel layer in the belief it improves drainage, when it can do the opposite.
- Forgetting about weight and stability, especially with tall planters in windy spots.
- Neglecting winter protection for tender plants and vulnerable roots.
Choosing your planter
Fill it well and a large planter earns its place for years, not just a season or two. It comes down to the basics: drainage that works, fillers used sensibly, decent compost and a bit of regular care.
Still choosing the container itself? Lux Unique designs and makes bespoke metal planters in the UK, in shapes from tall and round to extra-large and bottomless, and in Corten, galvanised or powder-coated steel. Whether you want a single statement piece or planters for a commercial project, get in touch about custom sizes and finishes.